How to Fix 404 errors on Wordpress Site
To remove this, you can follow three ways you can tackle the WordPress 404 error:
- Resetting your WordPress permalinks.
- Restoring your .htaccess file.
- Disabling your themes and plugins
Are you encountering frequent WordPress errors?
What the WordPress 404 Error Is (And What Causes It)
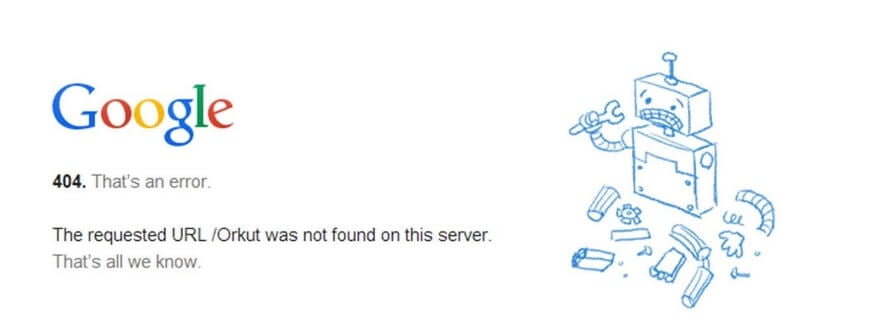
The 404 error pops up when you try to access a page and your browser can’t find it. Depending on which browser you use, the message can vary slightly in its presentation. Firefox, for example, hits you with a “404 Not Found” error. Chrome, on the other hand, shows you a message that reads “404. That’s an error.”:
While these default error messages can be quite vague, any website can set up its own custom 404 error page. This isn’t strictly necessary, but it enables them to explain to visitors that the site does work, and the only problem is the specific page they’re trying to look up.
Regardless of what they look like, there are a lot of things that can cause a WordPress 404 error to occur. These include:
- A mistyped URL. In some cases, the error can be as simple as an extra letter typed in the page’s URL.
- Caching problems. Sometimes, your browser may cache the page you’re trying to access while it can’t be found, so you’ll keep seeing the 404 error even if your site is working for everyone else.
- An issue with your Domain Name Server (DNS) settings. Your domain may not have propagated yet to the DNS you’re using, so you see the error when you try to access one of your site’s pages.
- WordPress compatibility issues. In some cases, problems with a plugin or theme may affect the way WordPress generates URLs and permalinks for your website. Then, if anyone tries to access an URL that doesn’t work anymore, a WordPress permalinks 404 error occurs.
It’s important to understand that the 404 error isn’t unique to WordPress alone. It can crop up regardless of which platform your website uses. However, if you’re using WordPress, you have an advantage – there are plenty of ways you can go about troubleshooting the issue. Let’s talk about what to do if you find yourself faced with a WordPress 404 error.
What to Do Before Troubleshooting the WordPress 404 Error
In the next few sections, you’ll be editing some files on the WordPress backend. We’ll guide you through the entire process, so nothing is likely to go wrong. However, whenever you’re about to edit sensitive files in WordPress, it makes sense to back up your website beforehand – just in case.
After that, you’ll want to download and set up a File Transfer Protocol (FTP) client. We recommend FileZilla, which is open-source and offers all the features you might need. Then, when you’re ready, you can get to work on fixing those WordPress 404 pages.
How to Fix the WordPress 404 Error (3 Methods)
In some cases, WordPress page not found errors soon disappear on their own. This typically happens if they are caused by an error with your web hosting provider. Before starting any serious troubleshooting, we recommend that you try force-refreshing your website, after giving it five or ten minutes to sort itself out.
If the error persists for longer than that, it’s safe to assume that there’s an underlying issue with your website. In that case, let’s run through three potential solutions, one by one.
1. Reset Your WordPress Permalinks
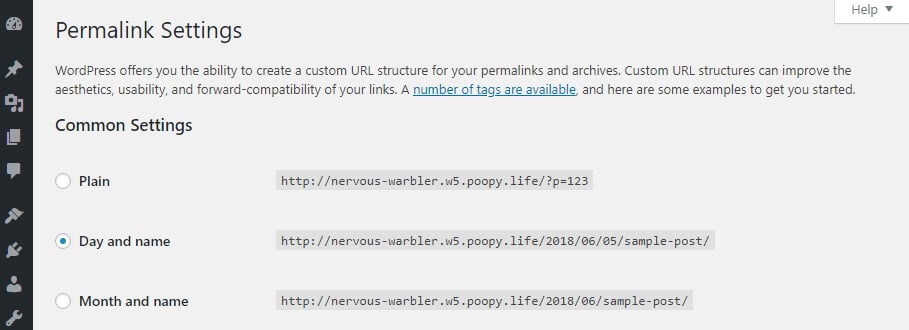
One of the most common causes of the WordPress 404 error is a problem with the way WordPress generates your permalinks. As you may know, WordPress provides you with several options for formatting your posts and pages’ links. For example, you can configure the platform to use plain numeric links, or set each post’s name as its URL:
In any case, the first thing you’ll want to do when you run into a 404 error on a WordPress post is to reset your permalinks. There are two ways to do this, one through your dashboard and another via FTP. If you have access to your dashboard, you’ll want to follow the rest of the instructions in this section. Otherwise, you should skip down to method number two.
If you can get into your dashboard, start by navigating to your Settings › Permalinks tab. Once you’re in, you’ll want to take note of which structure your site is using at the moment. You’ll need to change it temporarily in order to reset WordPress’ permalink settings, but you’ll change it back in a moment.
For now, select the Plain option under Common Settings, and click on the Save button at the bottom of the page:
The page will reload. Then you can go ahead and choose your previous permalinks type, and save your changes once more. That’s all it takes to reset your WordPress permalink structure.
Now, go ahead and try to browse your website as you would normally. Check out the pages that returned WordPress 404 errors before, and see if they persist. If the error is gone, then pat yourself on the back – it only took you one shot to fix it!
2. Restore Your WordPress .htaccess File
When you make changes to your WordPress permalink structure, they get saved to a file called .htaccess. That particular file governs how WordPress interacts with its server, as well as the way it generates URLs for your pages.
If you don’t have access to your dashboard due to the WordPress posts 404 error, you’ll need to edit .htaccess manually to reset your permalinks. To get started, access your website via FTPand navigate to your WordPress root folder. This is the directory that contains your WordPress installation, and it’s commonly located in a folder called public_html or www, or is named after your website:
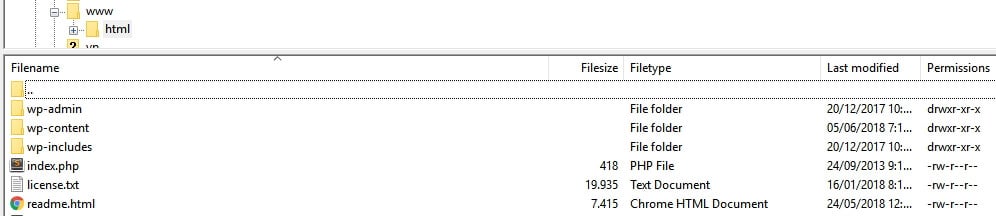
Open that folder now, and look for the .htaccess file within. If you’re using FileZilla, you’ll want to right-click on the .htaccess file and select the option that says View/Edit. What this does is download a copy of the file to your computer, and open it using your local default text editor. Now, you’ll be able to make any changes you want to it.
If you don’t understand what all the code in this file does, don’t worry. You shouldn’t make any changes to it unless you’re sure about them anyway. However, what you can do is use the default WordPress .htaccess code, which looks like this:
- # BEGIN WordPress
- <IfModule mod_rewrite.c>
- RewriteEngine On
- RewriteBase /
- RewriteRule ^index\.php$ - [L]
- RewriteCond %{REQUEST_FILENAME} !-f
- RewriteCond %{REQUEST_FILENAME} !-d
- RewriteRule . /index.php [L]
- </IfModule>
- # END WordPress
That’s a bare .htaccess file, with no modifications to it. That means it will remove any changes made to your permalink structure. Go ahead and backup the contents of your old .htaccess file now, and replace them with the code snippet above.
After that, save the changes to your .htaccess file using your text editor and close it. FileZilla will ask if you want to replace your existing .htaccess file with the copy you just edited. Agree to the prompt, and that’s it! You just reset your WordPress permalinks manually, without breaking anything in the process.
At this point, go ahead and try to access WordPress again. The 404 error should be gone, which is excellent news. However, you’ll still want to put your permalink structure back to the way it was before unless you like numeric URLs for your posts.
Remember, you can change the way your permalinks look by going into your dashboard and navigating to the Settings › Permalinks tab. Once you’re in, just choose the structure your website used before the whole 404 debacles started, and save your changes. Then, everything should be back to normal.
3. Disable Your WordPress Themes and Plugins
As we mentioned earlier, sometimes your plugins and themes can affect your WordPress URL structure, depending on their settings. If you tried one or both of the previous methods and the WordPress 404 error still persists, disabling your themes and plugins is your best bet.
There are two ways to do this, depending on whether you have access to your dashboard or not. If you do have access, go to the Plugins › All Plugins tab and follow this process for each of your plugins:
- Click on the Deactivate button below the plugin’s name.
- Check your site, to see if the 404 error persists.
- If the error is still there, re-activate the plugin you disabled.
- Move to the next plugin on the list, and repeat the process.
Your goal here is to eliminate each plugin as a suspect, one by one. You could disable all of them at once, but in most cases, it’s a single plugin that’s causing your problems. If disabling one of your plugins fixes the issue, you have three options. You can see if there’s an update available, keep the plugin temporarily disabled until there’s an update, or uninstall it and look for an alternative.
If you’ve checked all your plugins and none of them is to blame, you’ll also want to make sure your active theme isn’t behind the 404 error. This process is much faster since you only have to check one theme. Go to your Themes tab and switch your active theme to anything else:
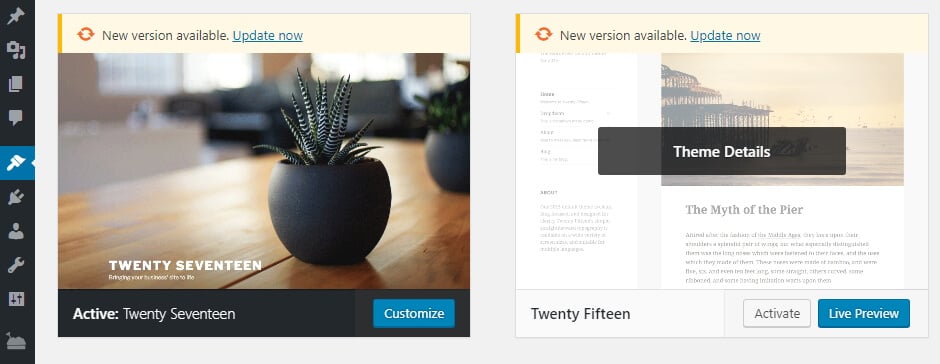
Now, check to see if the WordPress 404 error is gone. If it is, then you again have to choose between looking for an update or finding a new theme. Switching WordPress themes can be a bit of a hassle, but it’s worth it in the long run if your current theme is resulting in errors.
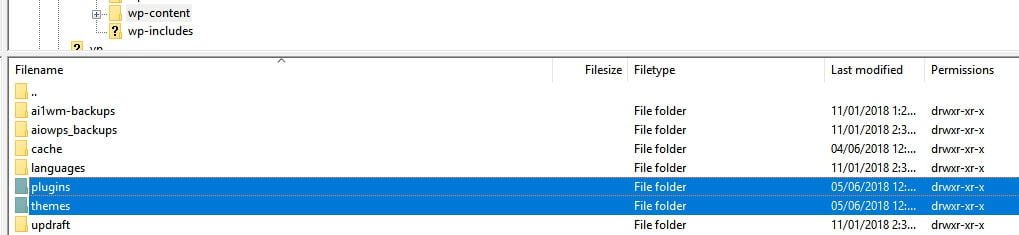
If you don’t have access to your dashboard, you can still disable your theme and plugins manually via FTP. To do this, access your website using FileZilla, then navigate to the public_html/wp-content directory. You’ll find several folders here, two of which are called plugins and themes respectively:
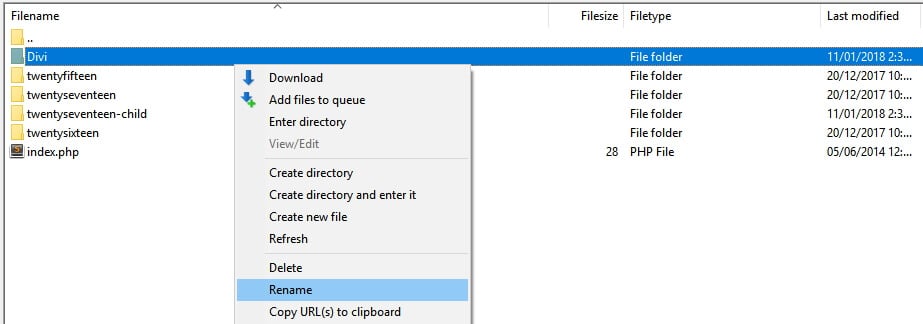
Go into the plugins directory first. You’ll notice that there are individual folders for each plugin installed on your website. What you want to do is select one of those folders, right-click on it, and choose the Rename option:

Change the folder’s name to something like akismet.disabled, so you can still easily identify it. The mere act of changing the plugin folder’s name is enough for WordPress to disable it. Now, check to see if the 404 error is gone. If it isn’t, return that folder to its original name, and repeat this process in turn for each other plugin within the directory.
If one of your plugins is behind the error, you know how to deal with it by now. However, if they all come up clean, you can move on to the wp-content › themes directory. Once you’re in, look for your active theme’s folder and rename it, just as you did with your plugins:
Since WordPress always needs an active theme, disabling yours will cause the platform to default to one of its out-of-the-box options. This can affect the way your website looks, but don’t worry, it’s only temporary.
If the error is gone, you may need to look for a new theme. However, if it isn’t, feel free to restore your theme’s folder to its original name, so WordPress recognizes it again.